https://towardsdatascience.com/transfer-learning-in-tensorflow-9e4f7eae3bb4
Introduction
This story presents how to train CIFAR-10 dataset with the pretrained VGG19 model. I will be using the VGG19 included in . The primary goals of this article are to understand the concept of transfer learning and what steps should be concerned along the way. You can find the jupyter notebook for this story
.
I have previously written an and a
about building classical CNN model to train CIFAR-10 dataset. In this way, I can compare the performance between the state of the art CNN model and the basic CNN model.
Transfer Learning
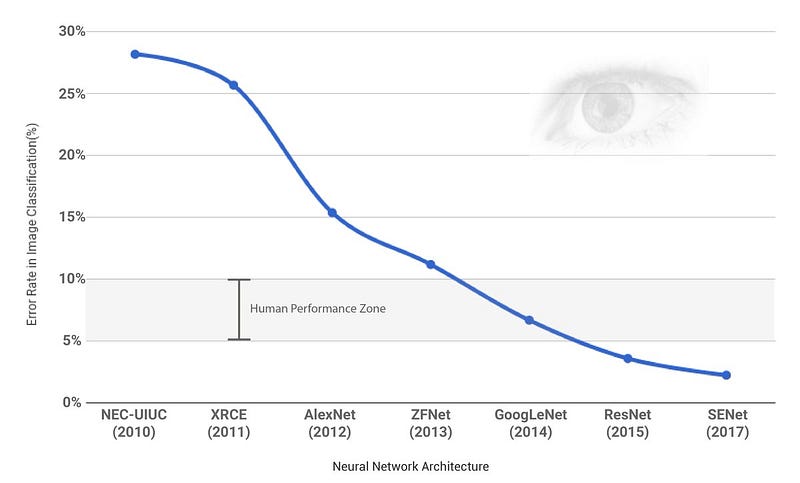 Winners of ILSVRC since ‘10
Since 2012, when AlexNet emerged, the deep learning based image classification task has been improved dramatically. Along the way, a lot of CNN models have been suggested. Even though some of them didn’t win the ILSVRC, they such as VGG16 have been popular because of their simpleness and low loss rate.
It takes couple of weeks to train the model against entire ImageNet database even with high end GPUs. It would be ideal if we can re-use the proved models from ILSVRC so we don’t need to spend a lot of time on training and verification. Transfer learning is exactly what we want.
Transfer learning is about borrowing CNN architecture with its pre-trained parameters from someone else. When we train our own data on the top of the pre-trained parameters, we can easily reach to the target accuracy.
Choice of model
Before diving in, you have to choose which model to choose. It is entirely related to your physical environment and the goal your team aims.
Since ILSVRC requires models to classify 1,000 categories of images, some suggested models couldn’t show super performance. However, if your goal is to classify 10 to 100 categories of images, the models could be fit into your situation.
As CNN models has been evolved, the recent ones show quite complicated architecture. If we want to change/modify certain portions of the entire layer, or if we want to trouble-shoot which portion is the bottleneck for our problem, It is critical to understand how models work behind the scene.
from
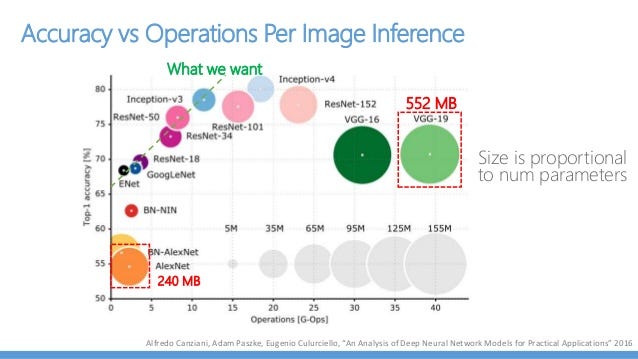
How big is the model? This often related to questions about the number of parameters or the number of layers. They number hints how long you need to spend time for training. Particularly, the number of parameters should be well considered when you use GPU hardware since GPU has a limited memory resources.
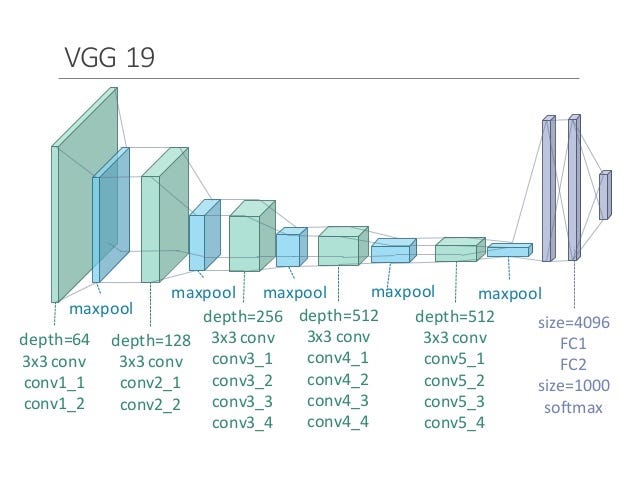
For my case, I chose the VGG19 model for some reasons. First, even though it didn’t win ILSVRC, it took the 2nd place showing nice performance. I only need 10 categories of images, so I though VGG19 is enough for CIFAR-10. Second, VGG19 architecture is very simple. If you understand the basic CNN model, you will instantly notice that VGG19 looks similar. Third, I have NVIDIA GTX 1080Ti which has 11GB memory. This one is not the best choice, but I thought it would be enough to run VGG19 even though VGG19 is a big in size. Lastly, since a lot of people uses VGG16, I wanted to give a shot with VGG19.
Choice of the model implementation
Actually, you can use your own implementation for the chosen CNN model. Since models from ILSVRC share their achievements including weights in their web-page, you can download (like ) and inject the weights into your implementation.
However, it takes pretty long time on not implementing the model itself but converting/injecting the weights from file and verification task. Fortunately, there are some open sourced implementation available in Github. Just remember before searching which CNN model you want and which platform(framework) you are up to like Tensorflow or PyTorch.
For my case, I use Tensorflow, and I happened to choose VGG19. I found two open sourced implementations, , and
. Interestingly, tensornets provides almost all popular CNN models including localization like YOLO. I thought I will probably use some of them often in the future, so that is why I chose tensornets to be familiar with.
Know how to create the model
There is no easier way but reading carefully on README document to know the usage of the chosen implementation. Generally speaking, the very first step is to know how to create/build the model graph. After building the model, you can load the pre-trained parameters (weights) into the model. Needless to say, without pre-trained parameters, it is not a transfer learning but just borrowing the architecture.
import tensorflow as tf
import tensornets as nets

# ImageNet input image shape is (244, 244, 3)
inputs = tf.placeholder(tf.float32, [None, 224, 224, 3])

# Output is dependent on your situation (10 for CIFAR-10)
outputs = tf.placeholder(tf.float32, [None, 10])

# VGG19 returns the last layer (softmax)
# model to give the name
logits = nets.VGG19(inputs, is_training=True, classes=10)
model = tf.identity(logits, name='logits')

# loss function applied to the last layer
# train on the loss (Adam Optimizer is used)
loss = tf.losses.softmax_cross_entropy(outputs, logits)
train = tf.train.AdamOptimizer(learning_rate=1e-5).minimize(loss)

# for measuring accuracy after forward passing
correct_pred = tf.equal(tf.argmax(model, 1), tf.argmax(y, 1))
accuracy = tf.reduce_mean(tf.cast(correct_pred, tf.float32), name='accuracy')
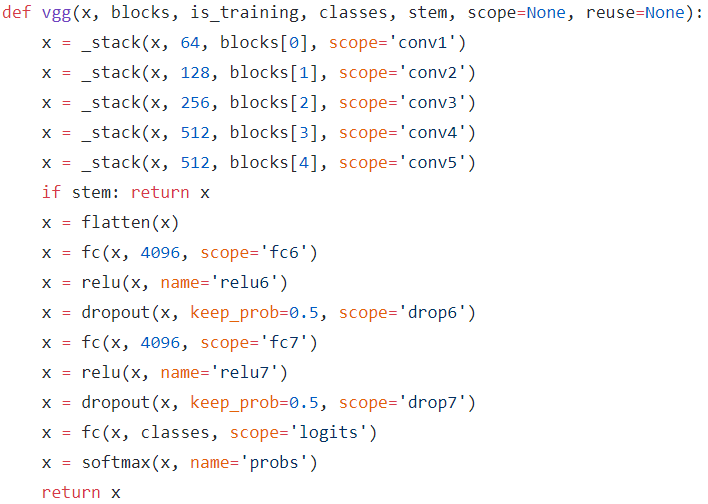
Specifically, for tensornets, VGG19() creates the model. You only need to specify two custom parameters, is_training, and classes. is_training should be set to True when you want to train the model against dataset other than ImageNet. classes is the number of categories of image to predict, so this is set to 10 since the dataset is from CIFAR-10.
One thing to keep in mind is that input tensor’s shape should be always [None, 224, 224, 3]. Because every models from ILSVRC is trained on the images provided by ImageNet whose shape is (224, 224, 3), this shouldn’t be changed even if your own data has the different size of images.
Know about the last layer
Actual implementation of the model of your choice varies in general. You should know what is the last layer of the model in order to apply loss function , optimizer, and perform accuracy test. You can easily find how the model is constructed through the code itself. The screenshot below is taken from tensornets github repo.
As you can see, VGG19 from tensornets returns the last layer as softmax activation function. If you know Tensorflow a bit, tf.nn.softmax_cross_entropy_with_logits() function is somewhat heavily used. However, this function is for applying softmax function and cross entropy loss function at the same place, so this shouldn’t be used here for tensornets. Instead, tf.losses.softmax_cross_entropy() function can be used which provides only cross entropy loss function. This one is equivalent to the former one except applying internal softmax function.
This is the second part of the Transfer Learning in Tensorflow (VGG19 on CIFAR-10). The first part can be found here. The previous article has given descriptions about ‘Transfer Learning’, ‘Choice of Model’, ‘Choice of the Model Implementation’, ‘Know How to Create the Model’, and ‘Know About the Last Layer’.
In short, the Part 1 is a kind of preparational step before training and prediction. In this article (Part 2), I will go over how to load pre-trained parameters, how to re-scale input images, how to choose batch-size, and then we will look into the result. You can find the jupyter notebook on my Github .
Know how to load the pre-trained weights
If you downloaded weights from the official web-site and tried to load them into your own model, that would be some hard work. That would be explained in a separate story, and I will write about it later time. However, that step wouldn’t be necessary if you have had found a handy implementation. In fact, almost every third-party implementation comes with the utility functions.
with tf.Session() as sess:
    # Initializing the variables
    sess.run(tf.global_variables_initializer())

    # Loading the parameters
    sess.run(logits.pretrained())
With tensornets, when you run pretrained() method on tf.Session, it will start downloading the pre-trained parameters and loading for you. That is very simiple. (As a reminder, logits is the VGG19 model itself created by tensornets.VGG19())
Know how to re-scale the original image(data) to fit into the model
In Part 1, We’ve seen that the shape of input image for ImageNet is (224, 224, 3), and we have prepared tf.placeholder with the exact same size. However, the images in CIFAR-10 have a different shape, (32, 32, 3), which is pretty smaller. Different shape image can’t be fed into the existing model because the matrix multiplication wouldn’t work. Instead, what we should do is re-scaling the image to (224, 224, 3).
The re-scaling process can be handled by skimage.transform package. The skimage.transform package comes with resize method. It is something like resize(image, output_shape, …). There are a lot of parameters to pass, but the first two is the most important ones. You pass the original image with the desired output_shape, which is (224, 224, 3) in our case, then resize will return the re-scaled image.
import skimage.transform

newImages = []

for image in images:
  newImage = skimage.transform.resize(image, (224, 224), mode='constant')
  newImages.append(newImage)
After re-scaling the images, we need to stack them in an array so that a batch of images can be fed into the model.
Batch Size
Batch size can be affected by your setup environments and the model you choose. As shown in Part 1, VGG16 and VGG19 are relatively huge in size. It means if you assign a large number of input image in a batch, the physical memory wouldn’t be able to handle it. If you run on GPU, this issue might be more sensitive since a GPU normally has less memory.
In my case, I have run the training on NVIDIA GTX 1080Ti which has 11GB memory. I have experimented with large batch size like 256, and I decrease the number over time. It turned out that my GPU could only afford 32 of the batch size at a time.
Accuracy Measurement in Valid-Set
If you look for some simple Deep Learning examples out there, you could find that they try to evaluate the accuracy against the whole valid-set. However, I found that this is not the case for VGG16 and VGG19 models. As I explained in above section, my GPU could only afford 32 of the batch size at once, and I have 5,000 images in the valid-set.
So, I decided to run the accuracy measurement process against valid-set in batching.
total_valid_acc = 0

for batch_valid_images, batch_valid_labels in batch_features_labels(valid_images, valid_labels, batch_size):
    valid_acc += sess.run(accuracy, {x:batch_valid_images, y:batch_valid_labels})

total_num_batch = valid_images.shape[0]/batch_size

print('Validation Accuracy: {:.6f}'.format(total_valid_acc/total_num_batch))
Result
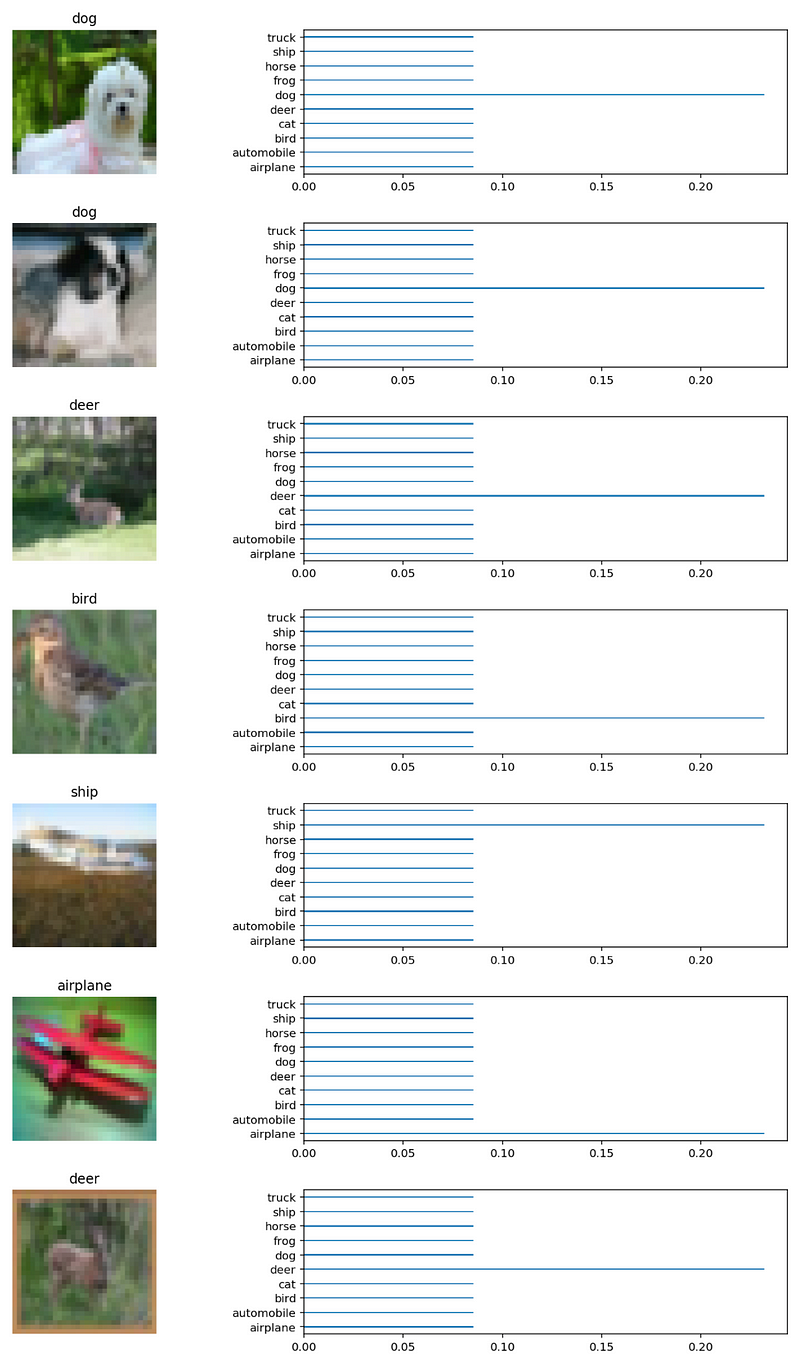
The capture below is the result. I have sampled 10 images randomly from the test-set. As you can see, VGG19 model has learned pretty well on CIFAR-10 image dataset even though it has such a small images.
Summary
Before ending this story, I want to summarize briefly.
- Transfer Learning is good starting point when you build up a image classification system
- Choice of model depends on your physical(H/W) environments and the your team’s goal (how many categories?).
- Choice of model implementation is not very important, but it would help streamlining the whole process.
- When using third party implementation, you should know three things. ‘How to create model?’, ‘What is the last layer?’, and ‘How to load pre-trained parameters?’
- It is important to know how to re-scale your own input images to fit into the chosen model (use skimage.transform package).
- Batch size should be carefully considered depending on your physical (H/W) environment.